E6 | Sustainable Grass, Driveway Lights | Ask This Old House
Season 24 Episode 6 | 23m 42sVideo has Closed Captions
Sustainable grass alternatives; common types of nail designs; brightening up a driveway.
Jenn Nawada visits a Rhode Island sod farm to see what sustainable grass alternatives they've been experimenting with; Tom Silva and Kevin O'Connor discuss the most common types of nail head and shank designs; Heath Eastman brightens up a dark driveway by adding house mounted landscape lights, upgrading the existing outdoor fixtures, and connecting all the lights to a smart system.
Problems playing video? | Closed Captioning Feedback
Problems playing video? | Closed Captioning Feedback
Funding for Ask THIS OLD HOUSE is provided by The Home Depot and Renewal By Andersen.
Support provided by:

E6 | Sustainable Grass, Driveway Lights | Ask This Old House
Season 24 Episode 6 | 23m 42sVideo has Closed Captions
Jenn Nawada visits a Rhode Island sod farm to see what sustainable grass alternatives they've been experimenting with; Tom Silva and Kevin O'Connor discuss the most common types of nail head and shank designs; Heath Eastman brightens up a dark driveway by adding house mounted landscape lights, upgrading the existing outdoor fixtures, and connecting all the lights to a smart system.
Problems playing video? | Closed Captioning Feedback
How to Watch Ask This Old House
Ask This Old House is available to stream on pbs.org and the free PBS App, available on iPhone, Apple TV, Android TV, Android smartphones, Amazon Fire TV, Amazon Fire Tablet, Roku, Samsung Smart TV, and Vizio.
Keep Exploring

This Old House Insider Newsletter
Get This Old House exclusive stories, tips, and behind-the-scenes information delivered right to your inbox every month.Providing Support for PBS.org
Learn Moreabout PBS online sponsorship♪♪ Kevin: On "Ask This Old House," our experts travel across the country to answer questions about your house.
♪♪ Today, Jenn visits a sod farm to learn about some innovations in grass alternatives.
Then Tommy gives us a lesson on nails, their sizes and uses, and Heath offers a smart solution to a homeowner struggling with lighting their outdoor space.
Jen: It looks amazing.
Thank you so much, Heath.
Kevin: All that on "Ask This Old House."
Jenn: For decades, homeowners have turned to sod for a quick and effective way to get the perfect lawn.
It's grown and harvested in sheets ready to be unrolled like a carpet, instantly transforming bare soil into a lush, green yard.
Today I'm visiting a sod farm here in Rhode Island, where they have been experimenting with alternative grasses.
Back in 2018, Roger, Kevin, and I came here to learn about their microclover blend, which required no fertilizer, no pesticide, and minimal watering.
So I've come back to see what Pat's been working on at the farm.
It's nice to be here again.
Pat: Jenn, glad to have you back at the farm.
The last time was with the microclover and we're working on some new sustainables.
Jenn: What do we have here?
Pat: Well, we're getting into wildflowers.
Jenn: You're telling me there's hope for you?
The sod guy is bringing me flowers?
Pat: Absolutely.
We've got trays here that we've grown in the greenhouse.
They've got about 20 varieties of wildflowers in there, annuals, perennials and biennials.
Jenn: Okay, so something's gonna be going off each season.
Pat: Exactly.
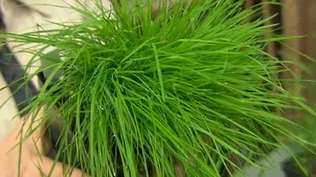
Jenn: Okay, so what's the root structure like?
Pat: Well, Jenn, here's the root structure.
And this is about 6 to 8 weeks old.
Jenn: It's pretty rugged.
Pat: It's very sturdy and ready to plant.
-Jenn: Okay.
-Pat: And what you want to do when you're gonna plant this is prepare your soil just like you would be with sod, a good 4 to 6 inches of loom.
Put it down.
It's gonna help with rooting in.
Jenn: And then you lay them like, just that close, right?
Like that.
-Pat: You might, but you might want to stagger the joints just like you would with the sod.
Jenn: Right.
That makes sense.
Alright.
So I like the application.
I mean, it's also providing a habitat for pollinators.
Pat: Oh, the pollinators love it.
Jenn: I see you brought -- Pat: The byproduct is very tasty.
Jenn: I mean, I could really see a lot of homeowners wanting this in their garden.
Pat: They do.
We've had homeowners come in that have hives, and they put this around the hives that supplies them with a year-round source of food for the bees.
Jenn: Yeah.
Pat: We've also had larger commercial jobs, universities that have put it in for the color and to have less maintenance of mowing grass around a building.
Jenn: Right.
You set it and forget it.
-Pat: Exactly.
-Jenn: Essentially.
Pat: We'll show you what we're working on now.
So this is our experimental field.
As you can see, we've done some test cutting.
And this has got sheep's fescue in it.
And the sheep's fescue is what helps to hold it together.
So we can roll it up.
Jenn: Right.
Because the wildflowers will break apart, right?
So that just helps it knit together.
Pat: The field looks a little humble right now, but in a couple of weeks, it's gonna look like this.
-Jenn: Wow.
-Pat: Isn't that spectacular?
Jenn: Deep purples and pinks.
And what time of year is this?
Pat: This is all about the end of May.
Jenn: Wow.
So that is spectacular.
I don't even know what to say, except I can't wait to use it at certain homeowners' places.
Pat: What you'll do is once you get a killing frost in the fall, you mow it down.
This field... -Jenn: Maintenance aspect.
-Pat: ...is two years old and has been mowed several times.
It reseeds itself.
Once you mow that down, the seeds drop in.
So it's constantly reseeding.
Sustainable.
-Jenn: Right.
And so that's very, very low maintenance.
Once a year is not bad.
Pat: Exactly.
The other thing with the sheep's fescue is erosion control.
And we have another field I'd like to show you of just sheep's fescue.
Jenn: Oh, I'd love to see it.
Pat: So, Jenn, you saw the sheep's fescue and how it clumped over there in the meadow mix.
Jenn: Yep.
Pat: This is a field of sheep's fescue that we've been maintaining.
And as you can see, it's a finer-bladed grass as opposed to this, which is a traditional grass that a homeowner would normally have.
You can see it's a little bit wider bladed.
Jenn: This is what I always order.
-Pat: Correct.
-Jenn: Right.
Pat: But a homeowner could use this.
But primarily what we've been doing is you can see we've already been harvesting some, mostly been going to golf courses.
Jenn: Okay.
So many homeowners have lands that abut conservation land, and there's that 200-foot buffer zone that you have to abide by.
Pat: Low-maintenance grass.
That's a perfect spot for it.
Yes.
-Jenn: Okay.
-Pat: Hillsides for erosion.
-Jenn: Yes.
Yep.
-Pat: Drought resistant.
-Jenn: Yep.
I think this is a brilliant choice.
And it's just nice to have alternatives.
Pat: Always nice to have alternatives.
Jenn: Yeah, well, I really appreciate my field trip to the farm today.
I've got to get out of here.
-Pat: Pleasure again.
Jenn: Alright.
We'll see you soon.
Okay?
-Pat: Absolutely.
-Jenn: Alright.
Take care.
Pat: So long.
♪♪ Kevin: Ooh, Tommy.
Cooking up some nail talk for us, huh?
Tom: I thought we'd nail it today.
-Kevin: Oh, brother.
Here we go.
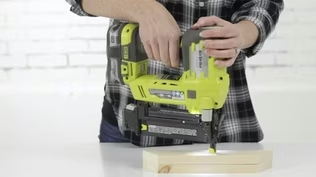
-Tom: We got all kinds of nails.
Most nails have the same anatomy -- a head, a shank and a wedge-shaped point.
Kevin: Right.
And I guess every nail has got those three components.
It's just a question of what type of head, what type of shank, what type of tip.
Tom: Exactly.
Like right here we have a flat head with a smooth shank.
We have one with a corrugated or waffle head and a little bit of a waffle head with that one right there.
Kevin: What's the waffle doing for us?
Tom: The waffle is keeping the head of the hammer from sliding off of the nail.
Now, this nail has a plastic coating on it and it can be slippery.
So you want the hammer again to stick to the nail as it hits that one little contact.
-Kevin: Okay.
-Tom: So then you have a trim nail right here or finished nail.
I don't like to use these nails outside because there's too much movement of the wood.
So I always want to use a common or a flat head nail for that and set it in and then fill it.
Kevin: Yeah, I mean, it's got a much smaller head by design because unlike the flat heads, which are designed to sit at the surface, you're gonna overdrive this.
So it sits below the surface.
-Tom: Right.
And you want to overdrive it with a nail set that fits the nail head.
Kevin: Because there's a very small depression in the top of that.
-Tom: You hit it with a hammer.
It doesn't slide off.
Kevin: Alright.
Duplex?
Tom: Duplex.
Alright.
Use a lot in framing and also in form work, like concrete forms, because you're nailing a nail in that's gonna be temporarily holding something that's gonna be pulled apart easily.
So you drive the first head down flush to the surface, but you have something that's sticking up so you can grab the hammer or a bar to pull the nail out so you can save the material and use it later.
Kevin: Super handy if you know you're pulling them out.
So different heads.
Now we've got different shanks.
Tom: Yep.
You got a smooth shank on a common nail right here.
And then a ring or cup shank.
And this one here is a spiral shank.
It twists when the nail goes in.
Kevin: So most typical situations, smooth shank is perfectly fine.
But a little extra holding power, those rings do quite a bit for us.
Tom: Plasterers would use them for a while that are also putting a subfloor down on top of a rough floor to, like, an underlayment, and you're not going into structure, you're going from a quarter inch into three quarter inch flooring.
It's not going to grab anything except that it goes into the fibers, it bends it, and those fibers just go into the -- snap into the cup a little bit and it really holds it well.
Kevin: Okay.
Tom: And this one here is a spiral shank, where you're gonna drive something down into the framing structure.
And it's really gonna hold.
It's gonna screw itself in every time you hit it.
Kevin: You've got a subfloor that's been secured with that thing, man, those are a bear to get out.
Tom: They are tough to get out.
They're even tough just to get started.
Need a cat's paw to get them up.
And then you got to pull them.
Lots of times you break the head off.
Kevin: Yeah.
Alright, well, I appreciate it.
Good information.
-Tom: My pleasure.
Kevin: Thank you, Tommy.
♪♪ -Heath: Hi.
Jen?
-Jen: Hi, Heath.
How are you?
Heath: Nice to meet you.
Jen: Thank you so much for coming.
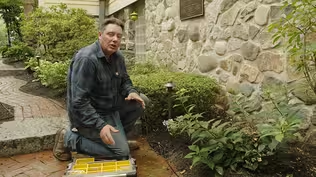
Heath: So I'm guessing this is the area you wrote in about?
Jen: Yes.
This is the area we have a bit of a lighting issue, so our guests tend to come up the driveway to enter our home.
And it gets pretty pitch black here at night.
And then they have to go up the spiral staircase.
So we'd like to kind of light it up a little bit.
Heath: Got it.
So what else do we have for lights?
Looks like we have one at the top of the stairs?
Jen: Yes, we do have a light at the top.
-Heath: Okay.
-Jen: It's kind of dull.
Doesn't really light up the space at all.
Heath: Okay.
And we have one at the basement stairs.
Is that yours as well?
-Jen: Yes.
This one, however, does light up the area a bit, but it's a manual switch.
I have to go down into the basement to flip it on, which no one ever does.
So we just mostly keep it off.
-Heath: So it never gets used.
Jen: It doesn't get used.
Heath: And then it looks like you actually have a floodlight on the garage as well.
-Jen: Yes, we do.
I also have to enter the garage to get this one on.
And when it is on, it's just this bright light.
Heath: And it might aggravate some of the neighbors and the people around here.
I can see that possibly shining into a window.
Jen: Yes.
You got it.
And we don't want to be those neighbors.
So we also tend to not use that.
Heath: You don't want that phone call.
Jen: We don't.
Yeah.
Heath: So from looking at everything, I think we have a couple of things we want to solve.
We want to make the area brighter without being too intrusive to the neighbors, and make it comfortable for guests to come into.
-Jen: Yes.
-Heath: And we need to find an easier way for you to control this.
I don't think that's too bad.
I think I have a couple of solutions.
Let me grab a couple of items you can take a look at, and we'll go from there.
-Jen: Awesome.
Heath: Alright.
Alright, Jen, so since you mostly use the driveway and your guests come up the driveway coming to the house, and that's pretty dark out there, I want to address that area first.
So the first option we have are a couple of things like this.
We can use an LED tape on the bottom side of that water table, that white board that runs the whole length of the house.
So this is the more standard type of LED tape that you see.
You can see it has the dots on it.
It's very flexible.
It can work around what we want to work around.
It's low voltage.
So it's 24 volts DC.
So for that, we end up using a power supply like this.
This will plug into the outside receptacle.
Then a couple of wires will connect to this.
And that's how that works.
-Jen: Okay.
Heath: This side's more of a continuous strip, a little more modern looking.
Nice thing about this one is it's 120 volt, plugs directly into the receptacle.
Doesn't need anything like this.
Very user friendly, very easy to install.
Also both of them cuttable to length.
Just pay attention to where you cut them, but you can order a little bit longer, cut it to where you want it and it's good to go.
The last option would be landscape lights, so we could do something like a wall light.
Jen: Love this one.
Heath: We could do a handful of those depending on how many you want.
Put those along that water table.
They require a transformer.
So it runs at 12 volts versus being able to plug in at 120.
Jen: So am I able to expand on this one?
Heath: Great question.
Yes.
So we're gonna put a transformer in, if you go this way, that's bigger than what you need.
So you can add additional landscape lighting in the future, so it's all controlled off that same switch.
Nice and easy.
-Jen: Oh, I love that.
I think that makes it very attractive option for us.
I love the idea of the strip.
I think it does the job.
Being able you can get it as long as you want.
I'm a little curious about the durability of the strips.
With New England weather, is it able to sustain the super cold and warmer days as well?
Heath: Great question.
So these are actually designed for outdoor use and they are rated for the temperature range.
So these are designed to operate below zero and above 100 degrees.
-Jen: Okay.
Well, Heath, these are some really great choices.
I think we're gonna gravitate towards the landscape light.
I just love how elegant the design is and the way that the light is casting downward.
I feel like it's gonna resolve our lighting issues.
Heath: I think you're absolutely right.
While I love the look of this and especially this guy -- It's a great path light, but it's just gonna be kind of a guiding path, but it's not gonna throw a whole lot out.
This I think will light up some of your driveway quite a bit.
That way people can see well, and again, you can expand on it easy enough.
Jen: Yes, absolutely.
Heath: Alright.
So if we're going with that, I'm gonna grab my tools and get started.
Jen: Wonderful.
Thank you.
♪♪ Hey, Heath.
Looks like you've made quite the progress here.
Heath: Jen, perfect timing.
So just starting to do the layout here and figure out where we want to put these before we start to attach them.
And we're trying to avoid all the obstacles that are in the water table itself.
We have the spigot, we have dryer vents.
We have a hot water heater vent over there.
We got a lot going on.
So what I was thinking of is starting at the center right about here.
-Jen: Okay.
Heath: And then it seemed like every six feet from that point forward worked out pretty well.
So I kind of laid them out on the ground for you to take a look at.
What do you think?
-Jen: I love the spacing, and I feel like it's gonna light up this driveway pretty nicely.
-Heath: I think so, yeah.
And what I'm thinking is I'd rather attach these down low, something close to that bottom edge.
Jen: Okay.
Heath: And then this actually have this little cavity here.
I can tuck the wires behind and keep everything concealed.
I think if we mount these, like I said, every six feet or so, I think it'll be pretty good.
Jen: Awesome.
Looking forward to it.
Heath: Alright.
I'm gonna go ahead and get started then.
Measure over six feet.
I'm just gonna hold it in place and mark the center.
The reason I marked the center is I want to cut a little groove.
So when this wire goes in, it can just tuck up under that board without looping down.
Keeping this fixture flush with the bottom board.
♪♪ And now that wire can tuck up neatly behind.
There you go.
Yeah.
Perfect.
That's it.
That's all we need.
Jen: I think that's the best one yet.
-Heath: Beautiful.
-Jen: [ Laughing ] ♪♪ ♪♪ Heath: So we've pulled the wire across.
We've got it stapled up underneath.
We left the loops where the lights are gonna go.
So now it's time to make the connections.
So what I'm gonna do is just split the wire.
So I have the two conductors.
Then I'm gonna strip them up.
Next the connector and slide it on there and just tighten the set screw.
And then I'll do the same for the other wire.
And I'll slide a sleeve over.
And then for the sake of polarity, I'm gonna pay attention to which side has the ribbing and which side does not.
It's the same on this.
That's the smooth one and that's the red one.
So I'm just gonna keep them in the same order just to rule out any potential issues.
Alright.
Connectors nice and solid.
Now to make them weatherproof.
Slide these over to about the middle.
And then we'll just start heating them up.
And what we're looking for with the final product is to see a little bit of the goo coming out at the end.
♪♪ And you can see right there that's nice and sealed around the wire on all sides.
That helps glue this together and keeps it weatherproof.
Now that we're able to install the lights and get the wire where we wanted it, we know where the transformer is gonna mount.
So we're gonna go ahead and secure this into place and then wire it up.
♪♪ Alright.
So the connection is very simple.
We just have the two wires.
Let's strip these back like we did for the fixtures.
One's gonna go to the common terminal and one's gonna go to the 12-volt terminal.
Tuck those over and we'll just put the cover back on loosely for now.
Alright, Jen.
So we have the lights installed down the driveway.
So now we're gonna focus on the exterior lighting of the garage and the house.
-Jen: Okay.
Heath: So I want to start with the garage.
And we have a couple of choices.
So the first one we're gonna take a look at is this is kind of a standard flood.
This is an LED bullet that we can put on the garage.
Second option is something like this.
It's more of a wall pack, more of a commercial idea.
But I think it actually might work really well in this application.
So you can see it's pretty flat.
It's not gonna shine the light out, but it goes out into the driveway.
-Jen: Yeah, I see that.
Heath: It does a really, really good job.
So when we hold them up like this, we can see how much of a difference we get out of the light of those.
So I think without blinding the neighbors and giving us a soft, comfortable area to work in, I think this might be a better choice.
Jen: Yeah, I would have to agree.
-Heath: Alright.
-Jen: What do we have here?
Heath: And then for the exterior light.
Well, I just kind of picked one for you.
Hope you like it.
-Jen: I love it.
I'm obsessed with this light.
I did have a question about these ones.
So how do I switch it on?
Am I still having to go into the garage?
Because I don't want that life anymore.
Heath: So hopefully not.
We're gonna try and get a smart switch to work in there.
But this one does have an optional photocell.
-Jen: Okay.
-Heath: We don't have to use it, but it could come on dusk to dawn if you want.
Jen: Great.
The easier the better.
-Heath: Yeah.
-Jen: Thank you.
Heath: Alright, Jen, so it's time to swap out the garage fixture.
Are you up for it?
-Jen: Let's do it.
Heath: Okay, so the first thing we did is we turned the power off.
And now it's time for you to take this fixture down.
-Jen: Okay.
-Heath: So you're gonna start by taking that little center cover off.
And then there should be a screw in there holding this in.
Jen: Alright.
Heath: So now we want to take the wires off.
We're gonna start by disconnecting the black, the white, then finally the ground.
Next we want to take the fixture bar off.
Jen: Alright.
Okay.
Heath: So the new fixture kind of mounts in a similar way, has a similar bar.
But the thread in the middle is a little bit different.
That's gonna go across those, just like the other one came off.
And just like that.
Jen: Alright.
Heath: Now we want to tighten those up.
And before you send them all the way home, you see how this has a little play?
-Jen: Mm-hmm.
-Heath: We just want to shoot for the center.
-Jen: Okay.
Heath: So let's loosen that ground screw up while you have that.
Jen: Okay.
Heath: Don't want it out.
We just want it loose, a little more.
There you go.
And I just want to wrap that wire around it as well.
Alright, Jen, now we're ready to install the new fixture.
So I'm gonna hold it in place for you.
Jen: Okay.
Heath: And we're gonna put these in a certain order.
We're gonna start with the ground wire.
That's gonna go on first.
Ground wire is always the first one to connect and the last one to disconnect.
-Jen: Okay.
Heath: Next we'll do the white wire.
Yeah.
And just line them up.
That's great.
Right there.
-Jen: Black wire.
-Heath: And now the black wire.
Yeah.
-Jen: Okay.
-Heath: So happy with those?
-Jen: Yep, I think so.
Heath: Great.
Okay.
So I'll hold this.
What we want to do is we want to tuck these into that space a little bit.
Get the wires all the way in there as best we can.
-Jen: Okay.
-Heath: Alright, Jen.
So I'm gonna hold this into place.
Jen: Okay.
Heath: I just need you to look in and kind of line it up.
-Jen: Alright.
It's lined up.
-Heath: Right there.
And then there's a screw right there.
And that's gonna hold it in.
-Jen: Alright.
-Heath: Pretty good there?
-Jen: Yeah.
-Heath: Okay.
-Jen: That's pretty secure.
Heath: And let's just see how we did.
Need to tip a little?
Jen: Yep.
It's between the lines.
Heath: Alright.
Then we just want to put this little cap on.
Jen: Okay.
Looking good.
Heath: Now I'm gonna work on replacing the light fixtures on the side of the house.
I want to put a proper ground screw on the ground wire here.
Maybe a couple of number tens to hold this in a little more securely.
This spot right down here, this lowest screw is actually threaded for those screws -- Number 10-32 ground screw.
♪♪ Let's go ahead and see how our bracket fits.
♪♪ ♪♪ And now we can connect the fixture.
♪♪ ♪♪ Alright, Jen, so now that all the lights are on, it's time to put the smart switches in so we can control these.
And I figured we'd start in the basement since this is the one you'd never use at all.
Jen: I mean, I barely knew where it was located.
Heath: I'm just gonna start by taking the plate out.
Take these out of the way.
And our ground.
Jen: Okay.
Heath: Alright, Jen, so we've taken out the switch that controlled the exterior light fixture.
And you can see we have three wires here basically.
The feed in, the power, the load out that goes to the light fixture and the ground.
But our new switch needs a neutral.
So in order to get to that, that's in the back of the box here, I'm gonna take this other switch out so we can go ahead and grab that as well.
-Jen: Okay.
-Heath: And there it is.
-You can see it coiled up... -Jen: Alright, yeah.
Heath: ...right there.
So what I'm gonna do is just add a little pigtail.
I'm gonna strip a piece up.
Alright.
So now we can just go ahead and tuck the neutrals back in.
And we can put the existing switch for the basement lights back in place.
So in this case we have five wires on the switch.
Our ground will go to the bare copper.
Our white will now go to the neutral here.
Jen: Yeah.
Mm-hmm.
Heath: This blue is actually gonna get capped.
-Jen: Okay.
-Heath: We don't need that.
That's if we have multiple switch locations.
The black will go to our constant power and the red's the light.
And now we'll do our best to fold those up as neatly as we can into the wall.
♪♪ Alright.
I'm gonna plug in this outdoor smart plug that works with the system.
I just want to secure it to the wall.
And then we'll plug our transformer in.
Alright, Jen, you get that last switch paired?
Jen: I sure did.
Heath: Alright, let's give that a try.
Jen: Alright.
Let's see.
-Heath: Look at that.
-Jen: Wow.
This is incredible.
Heath: I think it looks great.
I can't wait to see it at night.
Jen: It looks amazing.
Thank you so much, Heath.
Heath: You're welcome.
Thank you so much for the help.
-Jen: Thank you.
-Heath: Enjoy.
♪♪ ♪♪ Kevin: Next time on "Ask This Old House," Nathan takes a trip down memory lane visiting the Navy Seabees in Gulfport, Mississippi, to see what has changed since he left.
Then Tommy talks about hitches, the various parts, and how to properly attach them to a trailer, and Mauro helps a homeowner fix peeling paint on her galvanized steel railings.
Mauro: See how nice and easy that goes?
Kevin: All that on "Ask This Old House."


- Home and How To

Hit the road in a classic car for a tour through Great Britain with two antiques experts.


Support for PBS provided by:
Funding for Ask THIS OLD HOUSE is provided by The Home Depot and Renewal By Andersen.