E6 | Carolina Comeback | Community Carpenters
Season 47 Episode 6 | 23m 42sVideo has Closed Captions
Kevin visits a high school carpentry program that's helping the community after the storm.
In Swannanoa NC, Kevin O'Connor helps Noah Swaty install interior window trim. At Mountain Heritage High, he meets teacher Jeremy Dotts whose students are building tiny homes for storm victims. In North Asheville, electrician Mario Salamone installs a new meter and enclosure. Meanwhile, Tom Silva helps Paula turn an antique chest into a bathroom vanity.
Problems playing video? | Closed Captioning Feedback
Problems playing video? | Closed Captioning Feedback
Funding for THIS OLD HOUSE is provided by The Home Depot and Renewal By Andersen.
Support provided by:

E6 | Carolina Comeback | Community Carpenters
Season 47 Episode 6 | 23m 42sVideo has Closed Captions
In Swannanoa NC, Kevin O'Connor helps Noah Swaty install interior window trim. At Mountain Heritage High, he meets teacher Jeremy Dotts whose students are building tiny homes for storm victims. In North Asheville, electrician Mario Salamone installs a new meter and enclosure. Meanwhile, Tom Silva helps Paula turn an antique chest into a bathroom vanity.
Problems playing video? | Closed Captioning Feedback
How to Watch This Old House
This Old House is available to stream on pbs.org and the free PBS App, available on iPhone, Apple TV, Android TV, Android smartphones, Amazon Fire TV, Amazon Fire Tablet, Roku, Samsung Smart TV, and Vizio.
Keep Exploring

This Old House Insider Newsletter
Get This Old House exclusive stories, tips, and behind-the-scenes information delivered right to your inbox every month.Providing Support for PBS.org
Learn Moreabout PBS online sponsorshipKevin: Today on "This Old House".
Here in Yancey County, they've got a lot of rebuilding to do.
It turns out there's a group of high school students who are stepping up to do just that.
Student: I say this is truly something unique.
Like a little heart of gold in this school.
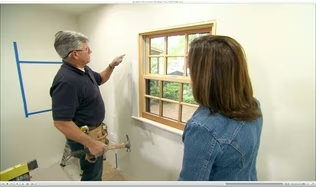
Kevin: And I'm about to help Noah install some window trim.
♪ ♪ ♪ ♪ [ Power tool whirring ] Kevin: Hey, there.
I'm Kevin O'Connor, and welcome back to "This Old House" here in western North Carolina, where we are following the rebuilding of five homes that were damaged by Hurricane Helene.
Three of those houses are right here in Swannanoa that was devastated by flooding when the Swannanoa River, just behind me, overflowed its banks.
The water got up to the eave line on these homes.
Well, remarkably, after six months of digging out, and with the help of thousands of volunteers across this region, some of our homeowners are just weeks away from moving in.
Down the street at Miah's house, the countertops are in and tile is starting to be installed.
Here at Jim and Allie's, the tile is done and they are starting to put down the wood floors.
And across the street, I'm about to help Noah install some window trim.
Hey, Noah, good to see you again.
Noah: Hey, Kevin.
Kevin: I love to see and hear about all the progress going on down here.
Noah: Thanks.
We're pretty pumped.
Kevin: Yeah, including drywall and windows in here.
And I'm told, uh, window trim today.
Noah: Yeah, we'll do some window jambs and case them out.
Kevin: Alright.
What's your plan of attack?
Noah: I'll build the jamb as a box, and then I'll build the casing as a box.
Kevin: Let me just pull this out right here.
So top jamb, side jambs.
These are going to run long.
You've nailed them in place.
Finish screws, actually.
And how have you affixed your casing?
Noah: We pocket screw the sides to the top and bottom.
Kevin: Right.
Noah: And that holds everything square.
Kevin: I'll just set this back here.
Noah: Okay.
So I'm just taking some numbers for my jamb extensions.
I've got the bottom.
So let's measure, uh, from the window opening from here to here.
Kevin: I've got 50 and 5/8 on my side.
Noah: Perfect.
Me, too.
So we'll add a 1/2 inch to that to give our 1/4 inch on the bottom, 1/4 inch on the top.
Kevin: Roger that.
Noah: And then for our -- for our top and bottom width I'll add an inch and a half plus a 1/2 inch for my reveal.
Kevin: So the inch and a half is the 3/4 width either side times two.
Noah: Exactly.
Kevin: 1/2 inch is a 1/4 inch reveal times two.
Noah: That's it.
Kevin: Did you get the depth for our jambs?
Noah: No.
What do we have from the window to the sheet rock?
I've got 3 and 3/16.
Kevin: I got 3 and 5/16.
Noah: Okay, we'll go with the biggest number.
Kevin: Yep.
Noah: Just keep it simple.
3 and 5/16 it is.
Kevin: Okay.
And what are we using?
Pre-primed pine?
Noah: Yep.
[ Power saw whirring ] Alright.
95 and 5/8 for our top and bottom.
[ Whirring continues ] Pop a couple nails in it just to hold it where we want it.
So this is the trim head screw I'm going to use.
You can see it's threaded up to about 3/4.
So now we're ready for casing.
♪ I got my pocket screw jig here.
♪ Just pop this over to the next one.
♪ ♪ See how we did.
I'm gonna pop this inch and 1/4 nail in.
♪ ♪ Look at that.
Nice.
Okay.
Kevin: Set it home.
I love it.
Look at that, huh?
It's a big, beautiful open.
And it looks even better with the casing on it.
Noah: Looks great.
Kevin: Nice job, Noah.
♪ Here in Yancey County, about 35 miles northeast of Asheville, Helene destroyed 1,400 homes and damaged another 2,300.
That's 1/3 of all the houses in this community, which means they've got a lot of rebuilding to do.
And it turns out there's a group of high school students who are stepping up to do just that.
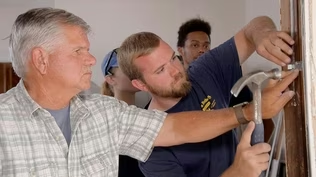
[ Hammer thumping ] The Michael Orr Construction Training Facility was founded nearly 20 years ago to give students at Mountain Heritage High School practical experience in the building trades.
Carpentry instructor Jeremy Dotts runs the program.
Jeremy: Most of the kids start out as a sophomore.
They start out by taking Construction Core, which is the beginning course.
They're going to learn all about basic safety, hand tools, power tools.
Then they would move into carpentry one as a junior.
After that, in their senior year, they sign up for a carpentry two honors course.
Kevin: While tackling more advanced building projects, students in the honors course can also earn college credits.
Jeremy: They receive up to nine credit hours for three of the courses that they take with me.
And those can transfer to any college in North Carolina.
So if they want to go and become an estimator or a project manager, those classes will transfer to those colleges and they will already have received credit.
Alright.
Manuel, take yours up.
Andrew, hold.
Hold.
Sawyer: The way he teaches, it's very hands-on.
You go in, you do the bookwork portion of it.
He kind of teaches you the vocabulary that you need to learn.
And then you come outside, he lays it out, you build it, you put it together.
If you mess up, you take it apart.
You do it again.
Kevin: Tell me about what happened, you know, in this county during Helene.
Jeremy: Back in September when Hurricane Helene hit, um, it just absolutely devastated Yancey County.
Yancey County was probably the epicenter of the storm.
I knew right away that the program had an opportunity to use what we have here to help rebuild.
Kevin: Part of the effort includes building what they call "tiny homes" for the community.
Jeremy: One of our tiny homes is 620 square feet, and that's being donated to a lady who lost -- lost everything.
in the other home, which is 800 square feet, and it will be for low income housing in a neighboring county.
Kevin: The materials used to build these homes have been supplied by a local nonprofit called Rebuilding Hollers.
Jeremy: Floor systems, wall systems, and roof systems are all built right here, and then we put everything together, make sure it all fits, fold the roof system flat, and get it ready for shipping.
Hensley: So here's our living room.
Um, over here, it's 2 x 6 studs.
Um, then we've learned how to frame this window.
We got your king stud there, and then your trimmers, and then you got your cripples down there with your header and your sill plate.
Kevin: Trimmers.
The first I've heard of that.
We call them jacks up by us, Jack studs.
Hensley: Yes, sir.
Yeah.
So we just learned how to frame a window.
Kevin: So this isn't just a curriculum project.
These are two code, ready for people to move into.
Jeremy: You got it.
We have to follow all the same building codes that any builder does.
Hensley: This is your master bedroom, bed on that back wall.
And then here's your bathroom.
You got the sink and stuff in there.
And then back here is a closet which also has a washer and dryer in it.
Stackable washer and dryer with some storage back there.
Kevin: Laundry room.
Right.
Hensley: Everything in here.
Kevin: Not too bad.
I mean, this is a -- this is a tasty little tiny house.
Hensley: Yeah.
It's pretty nice.
Jeremy: Our community as a whole, we need carpenters.
We especially need them now after the storm.
So they are going to have a skill set that is probably higher than some people that are already currently working at some of these jobs in construction.
We're very proud of what we do here.
[ Indistinct conversation ] Kevin: How much did you have a hand in building what's behind me here?
Hensley: I did the whole entire second story with my friend.
Kevin: Had you ever done anything like that to that scale?
Hensley: No, sir.
Andrew: Helping people out.
What better way to do it than when you can see it right there, how you help somebody.
Sawyer: It's definitely a great feeling, you know, knowing that what you're learning in school is being able to contribute to the real world and knowing that someone lost their home and then being able to supply them with a home.
It's really a great feeling.
How does it feel to actually pull some of this stuff off?
Nick: It's amazing, man.
I mean, you can't get any better than this.
You don't see this in very many places, especially in high school.
Andrew: I say this is truly something unique, like a little heart of gold in this school.
Something that's special.
At least special to me.
Kevin: Yeah.
Although there's much work to be done, the recipient of this tiny home is visiting the school next week to meet with the students.
Jeremy: And she wants to meet each and every one of you.
I want you guys to be here for that moment, because it's going to be very special for you.
It'll be one you'll never forget.
Okay.
You built her that house.
Alright.
Alright, guys, thank you.
Alright.
Y'all did amazing.
Amazing today.
Good job.
♪ ♪ Kevin: When Helene hit these mountains, it brought with it 40 to 50 mile an hour wind gusts.
You can imagine the damage that caused -- trees were down, but it also brought down our power wire.
Now this ran from the utility pole overhead into the house.
And today, we're going to start resolving this issue with the help of our electrician.
Hey, Mario.
Nice to see you.
Mario: Hey, Kevin.
Good to see you.
Kevin: So, uh... Oh, you've already got this underway.
We got a bit of a mess here, but you are cleaning it up for us.
Um, what are you putting in?
Mario: We're getting a new 200 amp overhead service, and we're coming down here into our new meter box.
Kevin: Beautiful.
Mario: This is what they used to have.
Kevin: So this is what got damaged in the storm?
Mario: Correct.
And now we are putting in a new meter box.
Kevin: So the obvious question I've got is, why are we going from a little toaster like this to a big, giant thing like that?
Mario: That's an excellent question.
So code has changed.
Back when there would be any issue at the house, a first responder would have to come out here and actually pull this meter.
Kevin: Really?
Mario: Um, and so what -- Kevin: The fireman would literally have to take this out to shut the power off?
Mario: Correct.
And so what code is wanting to do now is give them -- they have a dangerous job as it is -- a shut off switch.
And so all new meters are now labeled with emergency disconnect.
They'll be able to come up here to the house and shut the house off.
Kevin: Know that it's all fine.
Kevin: Okay.
Uh, so you've got the upright in, you've got the box attached to the wall.
You start -- ready to start working on conducting.
Mario: Yeah, we're landing our service lateral conductors.
If you don't mind holding that right there.
This is obviously de-energized.
Kevin: And what is that that you're putting on there?
Mario: This is antioxidant compound.
Being that we're using aluminum conductors, this is a way to keep it from loosening up over time.
And what we're going to do is we're going to just snug these down a little bit.
And we'll do the final tightening, uh, to specs with a torque wrench.
Kevin: Nice.
Okay.
That one's in there.
So what are your three conductors?
Mario: So we have, coming from the power company, we have two hots and a neutral, and each hot is feeding all your 120 volt loads in your house, like your outlets, your refrigerator, your microwave.
The two main ones are where you get your 220.
So that's your oven, that's your range, that's your heat pump -- any big load.
Um, that's where you get that from.
Kevin: Nice.
Okay.
Mario: Okay.
So we've completed the meter portion of our enclosure.
And so yeah, if you want to hand me that meter there.
Kevin: Eventually that plugs into this?
Mario: Correct.
So this is the power coming down from the power company.
And this is its hard brake.
So when this goes in, it makes the connection between the utility and the home.
And this is what we'll measure.
Kevin: Yeah.
So connection and measurement from this.
Mario: Correct.
Kevin: That'll go in later.
So by jumping it down to this side, this is what gets us into the house?
Mario: Correct.
And so what we have is we have our wiring coming from our subpanel in the house.
But the main disconnect is here.
Kevin: Yeah.
Mario: And so what these new enclosures allow you to have is a space for circuit breakers to be on the outside of the home.
So what we're going to do is we're going to terminate these wires, which are then the completion of this connection that will go into the house.
Kevin: So wait.
So when you say the breakers are here, if this is the shut-off, what are the breakers for?
Mario: They can be for hot tubs, electric vehicle chargers, heating and air conditioning equipment.
Or you could put landscape lighting.
Kevin: So without them, typically you'd be having to put those connections inside the house and then pull them back out.
You can skip that step and just come right out if this.
Mario: Correct.
Kevin: Clever.
And you're downstream of the meter.
So shut off and metering is all done.
Mario: Correct.
Kevin: Oh, very nice.
Alright.
So now we're ready to connect.
Mario: We're ready to connect these.
And if you notice, we have an extra wire now.
So because this is our main, we now have to ground our service.
And so going into the house, we're going to have a ground wire that is also going to tie into our ground rods.
There we go.
Good job.
Okay, so we've adjusted our torque wrench to 250 inch pounds.
And now we're going to tighten these down.
Kevin: Connections, especially electrical, are all about having the right torque and connectivity.
So if it's under connected, the wire will wear out over time and arc.
If it's over connected, you damage the strands and that can lead to a fire.
There it slips.
Mario: Did you hear that?
That was it.
Kevin: When it slips, you're there.
Mario: Yep.
♪ Now we're going to run our ground wire over to the ground rods.
Kevin: And so that's any errant electricity goes to ground as opposed to through the house or through us.
Mario: Correct.
[ Machine whirring ] ♪ Kevin: If you want to get going on that other one, I'll make this connection.
♪ So I've seen one of these rods put in, but never two.
Why did you use two?
Mario: So what we are doing is we're giving a clean path for any errant current to go to ground.
And code tells us that two ground rods gets us to where we need to be.
Kevin: Two is better than one.
Mario: Two is better.
Kevin: Okay, so bury that.
That looks like it's all buttoned up right in there.
You good to go inside?
We done out here?
Mario: We're done out here.
Kevin: Awesome.
Pleasure working with you.
Thank you.
Mario: Pleasure working with you.
Kevin: Alright.
I won't slow you down anymore.
I'll let you get to it.
Mario: Appreciate it.
Kevin: Thanks, Mario.
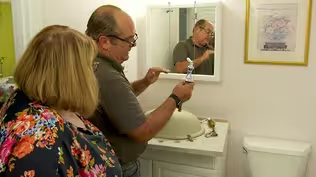
♪ Paula: Hey, Tommy.
Thanks so much.
Tom: Oh, well.
My pleasure.
This is a great antique chest that you're going to turn into a vanity.
I love it.
Paula: Yeah.
The bathroom is kind of a modern room, and I thought having a little antique in there would be a nice touch.
Tom: Nice touch, yeah.
So we're going to turn this into a vanity.
Paula: Mm-hmm.
Tom: And it's going to take a little bit of work because we have a sink that sits in the middle.
Paula: Right.
Tom: So obviously we won't be able to use this drawer because we won't be able to pull it out because of the sink and the plumbing.
So we're going to take this one right out of the way.
Maybe we'll just cut this down and just use the front.
Paula: Right.
That's what I was thinking.
It would just use the front of it.
Tom: Now this one, this is a beautiful drawer.
We're going to have to cut this drawer so you can utilize some of it.
We have to also make room for the plumbing that's got to go down.
Paula: Mm-hmm.
Tom: Alright, so let's get this out of the way right now.
Temporarily.
Lay it right down.
Right on the drop cloth.
Good.
Now, to mark the wall for everything, we had to make a template.
Paula: Mm-hmm.
Tom: It shows where the plumbing lines have to be drilled, and I mark the center locations for the pipes because the holes were off just a little bit.
That's why you always do a template.
So to line this up, we put it down face first.
Okay.
Here's my center line.
Paula: Mm-hmm.
Tom: And you're going to make it even on that end there.
And now I'm just going to tape it down so it doesn't move.
And now when I cross these marks across, it gives me a bullseye in the center of the hole where we can place our drill to drill the hole.
I wouldn't leave the drill running solid until you get a good bite.
So just pull the trigger and pump it.
Keep pumping it until you get down through.
Paula: Oh, like that?
Tom: Yeah.
There's a grab.
Now you got to be ready for it.
Paula: Now I'm not doing it.
[ Laughs ] Tom: Take your weight off of it.
Hold the drill firm.
There you go.
Hold it.
Paula: Alright.
Tom: Perfect.
Alright.
Now we'll take that off and put the smaller drill on.
Nice and easy now.
Don't push down hard.
There you go.
So now we're going to take the cabinet and stand it up so we can cut out some of the center section here.
Just put a metal cutting blade in there and you're all set.
Alright.
Alright.
So this stretcher will come right out.
[ Groans ] There it is.
So now what we're going to do is we're going to leave the 3/4 inch pieces around the perimeter.
And we're going to cut the center of this whole section right up.
Paula: Okay.
Tom: Let's see if we can get this out.
Yep.
Pick it up.
Paula: Alright.
Tom: Same thing over here.
We'll pick it up, and that'll give us plenty of room for the drain lines and the water lines of the sink.
Alright, so I'm going to push this drawer in.
This is the one we want to modify.
I'll show you exactly what we have to do.
I'm not going to push it in all the way.
Now, first thing I look at is the center mark for the cabinet, because that's going to be the center of the sink.
And our drain line is going to run right down through the cabinet.
So here's the center of our cabinet.
And if we look, I'll step back a little bit.
You can look at the back of the drawer and the holes that are on the wall back there.
See them?
There's our location.
Paula: Mm-hmm.
Tom: So there's a water line that's going to have a shut off on it, a drain line that's going to have a trap under it, and another water line right here.
Okay.
We'll draw a line there.
I'll slide this over here.
And I'm going to eyeball the edge of that hole right there for the water.
Put a mark there and come off the back out to the side.
And alright, now we're ready to modify the drawer.
♪ ♪ They should be both the same.
And they are.
♪ ♪ It's still going to have a lot of storage on each side, which is great.
We'll slide it in down the track.
Paula: Perfect.
Tom: Look at that.
This drawer you're going to have to modify next.
Right?
Paula: Right.
Tom: But it's going to be pretty simple.
Basically, what you got to do is you get all this out of the way, the plumber won't have any problem installing anything.
Paula: Oh, that's awesome.
Thank you so much for your help.
I'm pretty sure I can manage that.
I'll send you a picture when I'm done.
Tom: I'd love to see it.
I can't wait.
I know you're going to do a great job.
It's going to be a beautiful piece.
Paula: Thank you.
♪ Kevin: Hey, Tommy.
Tom: Hey, Kevin.
Kevin: Great progress coming from Swannanoa.
And then up in North Asheville, our electrician brought power to the house, so that's going to help them keep that moving along.
Tom: Making great progress there.
I'm making great progress here.
I mean, the outside is almost done, but a lot of the trim work still got to go, too.
Kevin: Yeah.
Tom: There's a lot going on.
Kevin: Yeah.
But good progress.
Tom: Absolutely.
Kevin: Good news.
Alright.
Well, more to come.
So until next time, I'm Kevin O'Connor.
And I'm Tom Silva.
"This Old House" here in western North Carolina.
♪ Next time on "This Old House"... Mauro: I'll show you how to make this fiberglass door to look like wood with just a stain.
Woman: Thank you so much, Mauro.
Mauro: You're welcome.
Jenn: This is the master plan of the entire property.
Right now, we're focusing on the front.
We're going to do a terraced retaining wall.
Woman: #2: That's pretty good, right?
Jenn: Yeah, yeah.
Kevin: And in Swannanoa, we are hanging solid core interior doors.


- Home and How To

Hit the road in a classic car for a tour through Great Britain with two antiques experts.


Support for PBS provided by:
Funding for THIS OLD HOUSE is provided by The Home Depot and Renewal By Andersen.